Whether it’s because of a bug within the tool or a misconfiguration in the Windows settings, these infrequent glitches, and crashes always cause a major inconvenience. Nevertheless, there are a few fixes that can help you repair and restore the snipping tool to its very best. So, if you’re a user who’d like to understand the situation and fix this problem, this guide is just for you. Listed below are all the possible methods through which you can fix your snipping tool in Windows 11.
Why Is My Snipping Tool Not Working?
There are many factors that could influence your application to misbehave. From outdated graphics drivers to internal bugs, here are some of the causes that could have prevented the snipping tool from working properly on your Windows 11.
How to Fix Snipping Tool Not Working in Windows 11
There are many fixes and repairs for troubleshooting the snipping tool in Windows 11. However, these fixes vary from user to user. A fix that worked for your friend might not work for you and vice versa. So, keeping this into consideration, here are all the fixes you can follow to solve your problem. These fixes can be followed in any random order.
Install All Windows Updates
Installing all available Windows updates is known to fix bugs and glitches within the system. It can fix the compatibility issues with newer systems and security patches. Follow to steps below to do so.
Update Your Graphics Driver
A graphics driver determines how your system interacts with your graphic component. Hence, an outdated graphics driver can cause corruption and misbehavior in an application. So, updating your graphics driver might fix your problem. Follow the steps shown below to update your graphics driver.
Turn Off Automatic Time
This method will fix your issue if the problem was originally caused by the expiration on the application’s digital certificate. This is a fix that’s been verified by the Microsoft Tech Community. The steps below show you how to turn off the automatic time.
Turn Off Focus Assist
Focus assist is a feature provided by the Windows OS that filters out unwanted and insignificant notifications to help you “focus” on your task at hand. Hence, it might have blocked the Snipping Tool in your system. The steps below show you how to disable Focus Assist on Windows 11.
Turn on the Background App Permission
If your application isn’t permitted to run in the background, it fails to take screenshots when in the background. The snipping tool is an efficient and small application that doesn’t clog up your RAM. So, manually enabling it to run in the background could fix the issue youre facing. The steps show you how to do so.
Repair or Reset the Snipping Tool
Windows 11 offers its users a built-in troubleshooter to troubleshoot any application directly from the app settings. You can either repair or reset your application if it isn’t working properly. If you repair an application, none of its app data will be lost. However, if you reset an application, all the app data will be deleted. So, by keeping this in mind, follow the steps shown below.
Reinstall the Snipping Tool
Reinstalling the Snipping tool could fix the issues caused by the previous corrupted installation. Furthermore, when we reinstall an outdated application, it resolves the hidden bugs that were preventing the app from functioning at full capacity. To reinstall an application, you have to uninstall it first. Here’s how to do so.
Run Snipping Tool From Windows.old Folder
Windows OS stores the essential files in a folder named Windows.old before upgrading to a newer operating system. So, if you recently upgraded to Windows 11 from Windows 10, you can run the snipping tool from the Windows.old folder.
Enable the Snipping Tool in the Local Group Policy Editor
Windows 11 policy settings are known to disable applications at times. So, the Windows 11 OS has an advanced administrator setting that uses the Local Group Policy Editor to help you undo any policies that you don’t want on your system. Enable the Snipping tool by following the steps below.
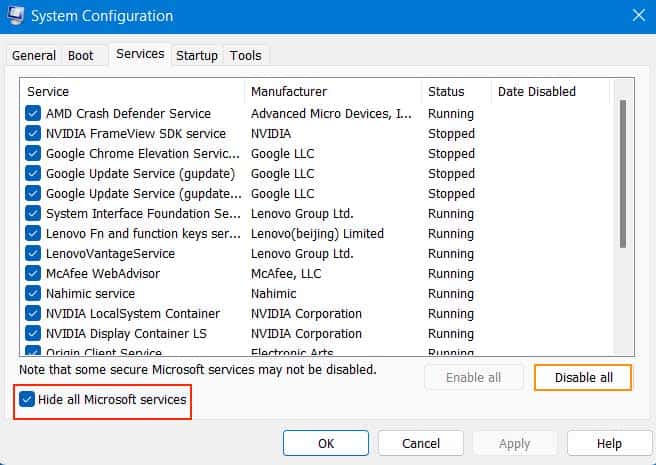
Perform a Clean Boot of the System
A clean boot starts the system with only the minimum required drivers and programs. So, if your Snipping tool is being interfered with by other applications running in the background, then performing a clean boot of the system might fix the issue for you. Here’s how to do it.


